Prerequisites
- Administrative access to the Uplevel Portal.
- Static IP configuration parameters from the ISP (address, gateway, netmask).
- A scheduled network downtime window — the change requires a gateway reboot to take effect.
Setting a static IP from the Portal
- Sign in to the Portal and navigate to the Overview section for the site you want to configure.
- Click Set WAN Static IP.
- Select Static IP from the dropdown.
- Enter the IP Address, Gateway Address, and Subnet Mask supplied by the ISP.
- Click Save to validate the entries.
- Click Commit To HW (hardware).
- Wait approximately 3 minutes for the configuration to write to the cloud.
- The static IP takes effect at the next reboot or power-cycle of the gateway.
Only the ISP can provide the static IP parameters for the client’s WAN. Uplevel doesn’t have this information.
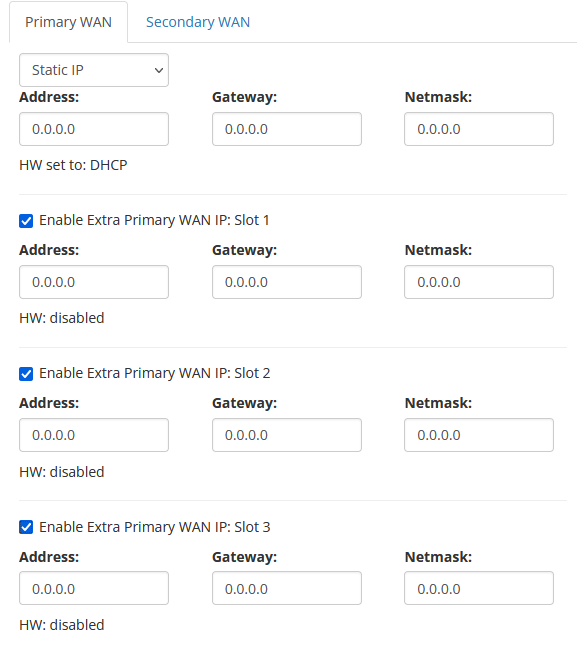
Adding multiple static IPs to a WAN port
If the ISP issued more than one usable static IP, you can assign the additional addresses to the WAN port and map them to LAN hosts under Firewall › WAN Mapping.
A single static IP is sufficient for most sites. The multi-IP feature is only useful if the ISP provided more than one valid IP and you host public services that need to be separated by source/destination address.
- Tick Enable Primary (or Secondary) Extra WAN IP: Slot X.
- Enter the Static IP Address, Gateway Address, and Netmask for that subnet.
- Click Commit to HW.
- Click Save — the change applies when the gateway reboots or power-cycles.
- Continue at WAN Mapping, in the Portal under Firewall › WAN Mapping.
Setting a static IP over the serial console (Windows)
If the gateway can’t reach the cloud — for example, because it was shipped with the wrong configuration — you can configure it locally over the serial console.
What you need
- PuTTY (www.putty.org).
- The Uplevel blue USB-to-serial console cable.
- FTDI drivers, available as a direct download from FTDICHIP.COM under Drivers › Virtual COM Port Drivers (VCP).
Connecting
-
Plug the RJ-45 end of the console cable into the gateway’s console port and the USB end into the workstation.
-
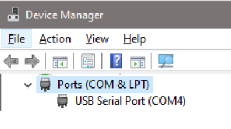
In Device Manager, expand Ports (COM & LPT) and note the COM number assigned to the USB Serial Port.
-
Open PuTTY.
-
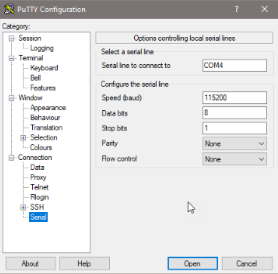
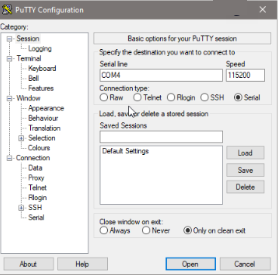
Choose Serial as the connection type.
-
Set the serial line to the COM port from step 2.
-
Settings:
- Speed (baud): 115200
- Data bits: 8
- Stop bits: 1
- Parity: None
- Flow control: None
-
Click Open.
Console commands
Tip. Type
helpafter any command in the console to see what options are available.
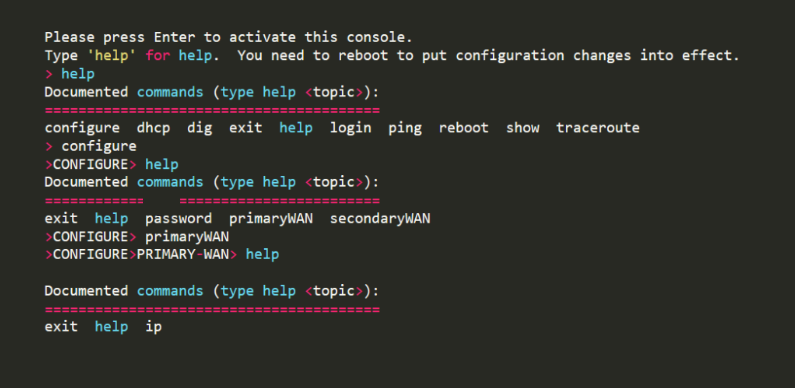
To set the Primary WAN port’s IP (use secondaryWAN for AUX):
configure
primaryWAN
ip
mode static
address X.X.X.X
gateway X.X.X.X
netmask X.X.X.X
exit
exit
exit
The three exit commands back out of ip, then primaryWAN,
then configure mode.
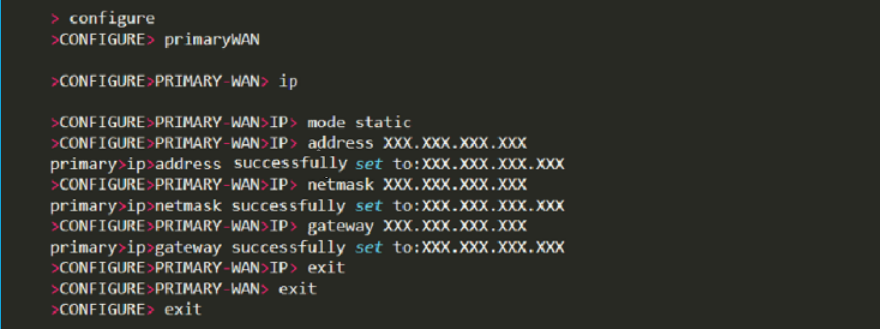
After exiting configure mode, either issue a reboot command or
power-cycle the gateway. The static IP takes effect once the box
is back online.
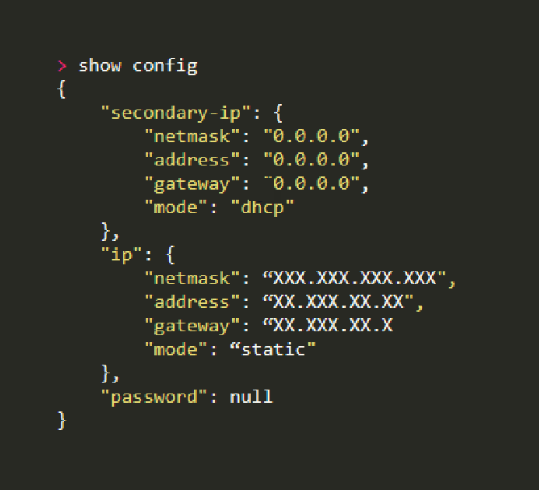
Tip. Run
show configto see the gateway’s current subnet configuration.
Troubleshooting
- Validation errors. Double-check the parameters against what the ISP supplied — and confirm the ISP actually finalised the order. They sometimes leave the static-IP request in a pending state.
- Console access problems. Confirm the FTDI VCP drivers are installed (see FTDICHIP.com).
- Configuration didn’t stick. Re-check the commit sequence
—
Commit to HWthenSave(Portal) or theexit; exit; exitladder followed by a reboot (console). - Still stuck? Call the Uplevel Support Line.